Tuesday, January 31, 2006

Need 2 player button

I will need a two player button as well. Can't start a 2 player game of Mr Do without the other button...

Monday, January 30, 2006

Marquee


Here's the marquee I've designed using images from the Internet. I may have to redo it since I believe the DPI is to low for print, but I haven't looked into it yet. This has been my first real attempt at using the Gimp, so it's good practice.

Control Panel 2


Here's how the control panel looks with a joystick and buttons. The trackball will look good there. I'm still investigating the spinner...

Control Panel


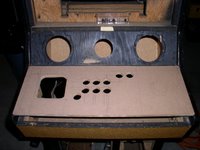
The control panel layout is complete. After getting the right drill bit for the buttons (1 1/8"), I finished the layout. It is designed with one player in mind. I think I will have a wireless USB controller for 2 player fun, since 95% of the time, I will be playing this alone or playing games player 1 and 2 rotate using the stick.

I am still undecided about the trackball, which will sit on the right. If I get one, it will go as shown in the picture. If I decide not to use one, I will move the joystick and buttons back to center. It is very tight with the trackball, but I really want to be able to play Centipede and Missle Command.

I wonder if I can get a spinner in there as well? Tempest just isn't the same without a spinner. This all has to fit in a 24" x 8" control panel.

I am still missing a few buttons. I need an EXIT button, PAUSE button, and CREDIT button. I also want to change the color of the buttons to match the Neo-Geo layout.

The Cabinet


Here is the cabinet I am starting with. It was originally an Atari Road Blasters System 1 cabinet. As you can see, I am missing some items from it. I am removing the monitor and building a control panel for it. I also will need a coin door. As for the control panel...

Saturday, January 14, 2006

And so it begins


The project is running full steam ahead now. I received my joysticks, buttons, and keyboard encoder on Thursday and now have the joystick up and running with the encoder. As you can see in the picture, this is just the beginning.

I am still going through my games list to determine which games I want to be able to play. My control panel layout still has not been finalized. I think it will be a one player layout, but more on that later.

My friend, and arcade cabinet builder, Jeff (see his examples here) gave me a piece of MDF material that I am going to use to test some layouts.

Questions and concerns:
1) Which gauge wire do I use?
2) How do I connect the wires? Do I solder them? Do I use quick connects?
3) I need the appropriate drill bits.
4) I need a decent drill
Tuesday, January 10, 2006

Parts have shipped

Well, it would appear the parts I ordered from GroovyGameGear.com have shipped. This is excellent. Hopefully they will be in by Friday and I can spend the weekend working on it.

Monday, January 09, 2006

First player stuff ordered

I just ordered a 4/8 way joystick, 8 buttons, and a keyboard encoder from www.groovygamegear.com. Since this is my first attempt, I just want to get the 1st player configs working correctly. This way, I can see if I like the joystick, see how the buttons should be layed out, etc. I also want to test out building the control panel. I've got some plywood I was going to use for this first round. So I need to make sure I've got or have access to the appropriate tools.

My initial questions:
1) What type of wire to use
2) How do I connect the wires to the joystick? Solder? Quick connects?

Hopefully the parts will be here by the end of the week so I can play this weekend.